

How to Bulk Upload Leads
Bulk Upload helps users upload multiple leads at one time instead of adding them manually one by one.
Using this module, users can:
- Upload fresh leads in bulk
- Upload leads with remarks/dispositions
- Map Excel columns with CRM fields
- Assign leads equally or condition-wise to team members
- Download error sheets for failed records
Supported File Types: .csv, .xlsx
Minimum Required Data in Sheet
Before uploading the file, make sure your Excel/CSV sheet contains the following mandatory fields:
- Name
- Mobile Number
- Source
- Sub Source
Important Validations
- Mobile number must be 10 digits
- Source and Sub Source must already exist and be active in CRM
- File format should be
.csvor.xlsx
If Uploading Leads With Remarks
Your sheet must also contain:
- Lead Type
- Disposition
- Sub Disposition
These values must also exist and be active in CRM.
You can use the sample sheet format for proper data structure.
Entry Point
Navigation Path In Panel:
Lead List → Bulk Upload CTA
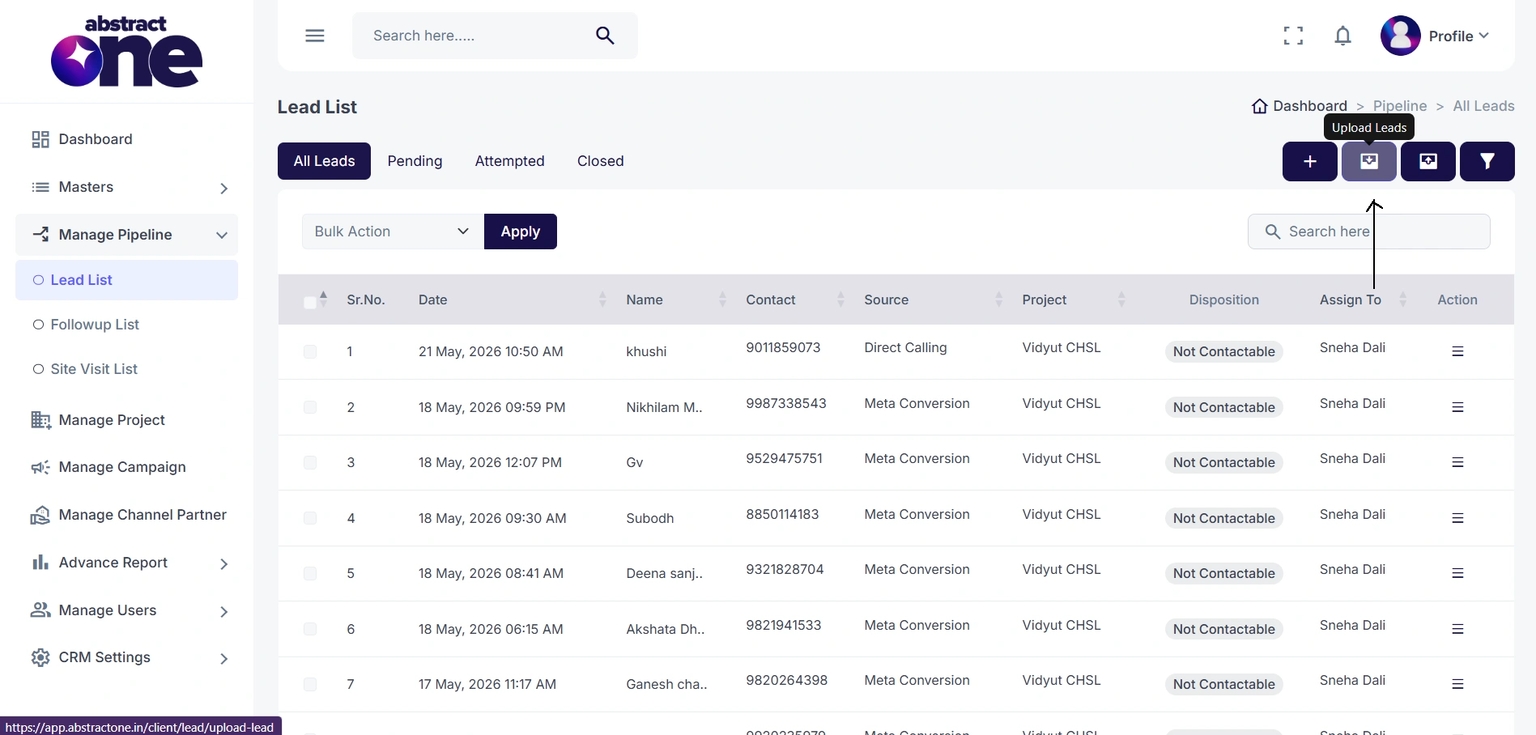
Or open directly:
https://app.abstractone.in/client/lead/upload-lead
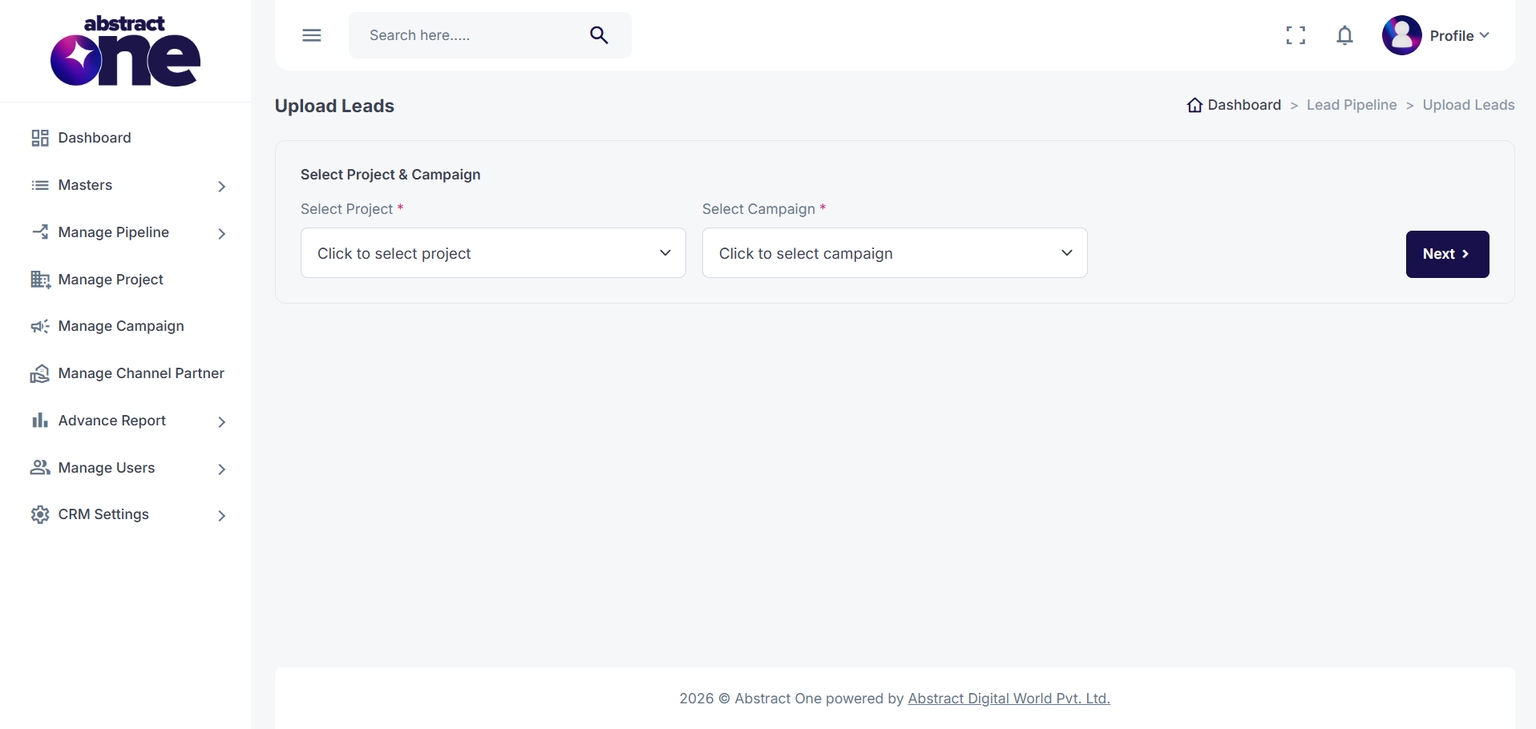
Step 1 — Select Project & Campaign
In the first step, select:
- Project
- Campaign
This defines in which project and campaign the uploaded leads will be added.
After selecting both fields, click Next.
Step 2 — Upload Excel / CSV File
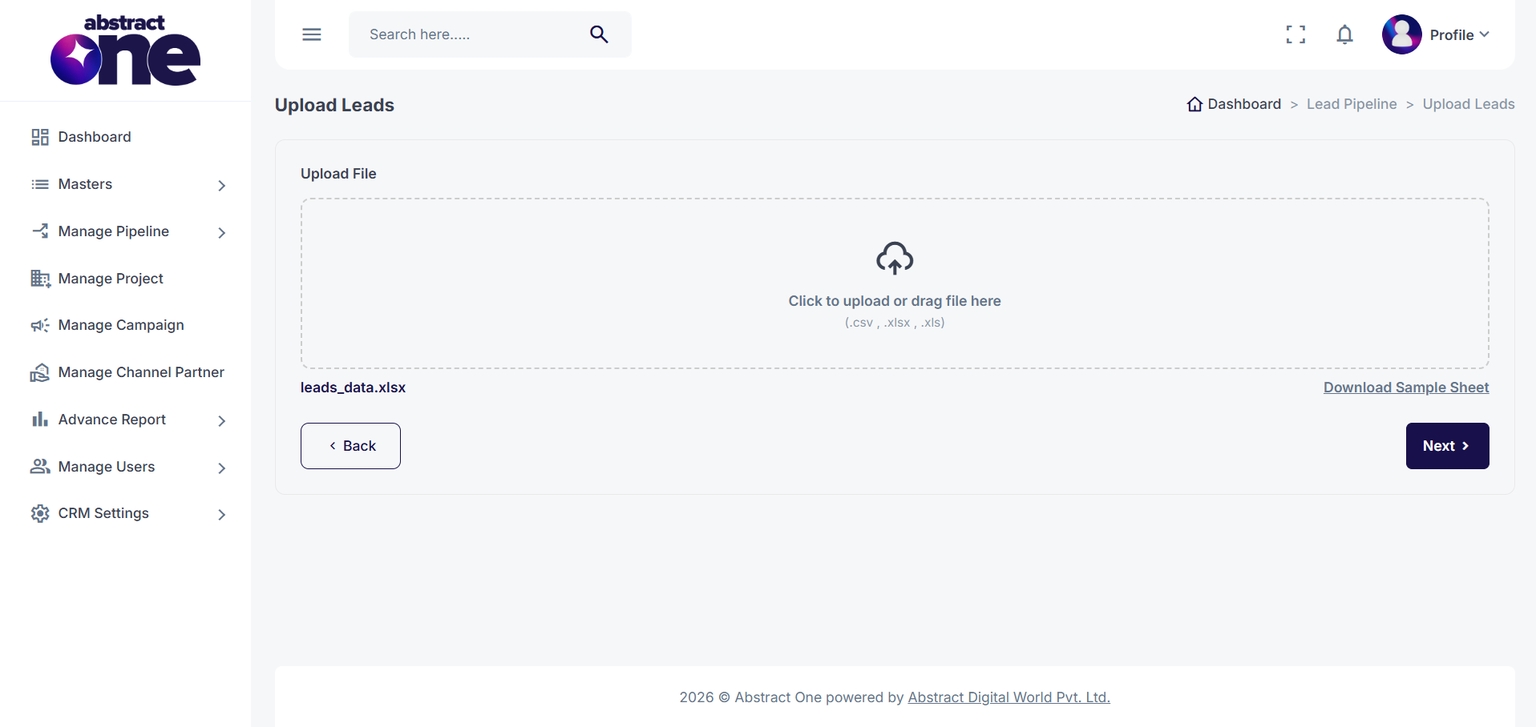
On the next screen, upload your .csv or .xlsx lead sheet.
Users can:
- Drag & drop the file
- Click to upload manually
- Download the sample sheet if required
Once the file uploads successfully, the uploaded file name will appear below the upload box.
After successful upload, click Next.
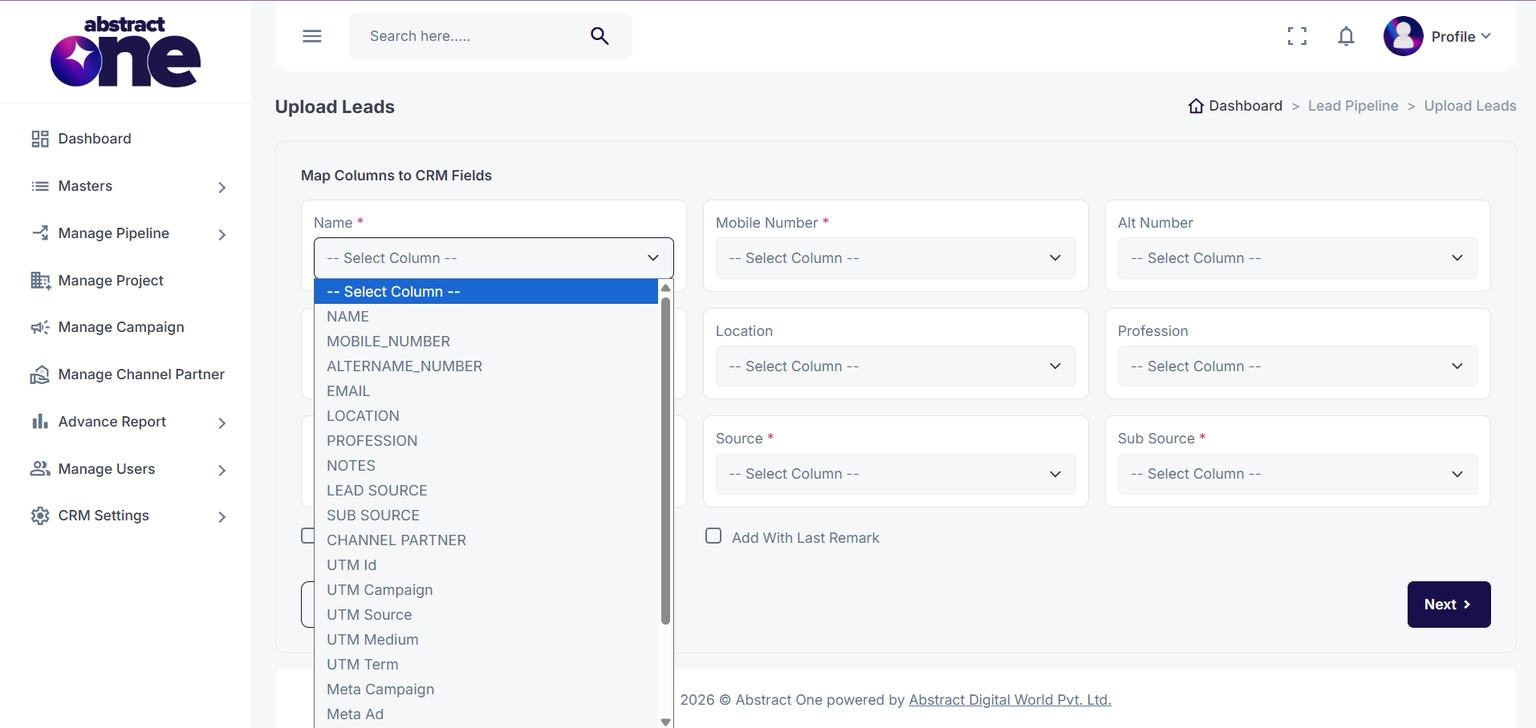
Step 3 — Map Excel Columns With CRM Fields
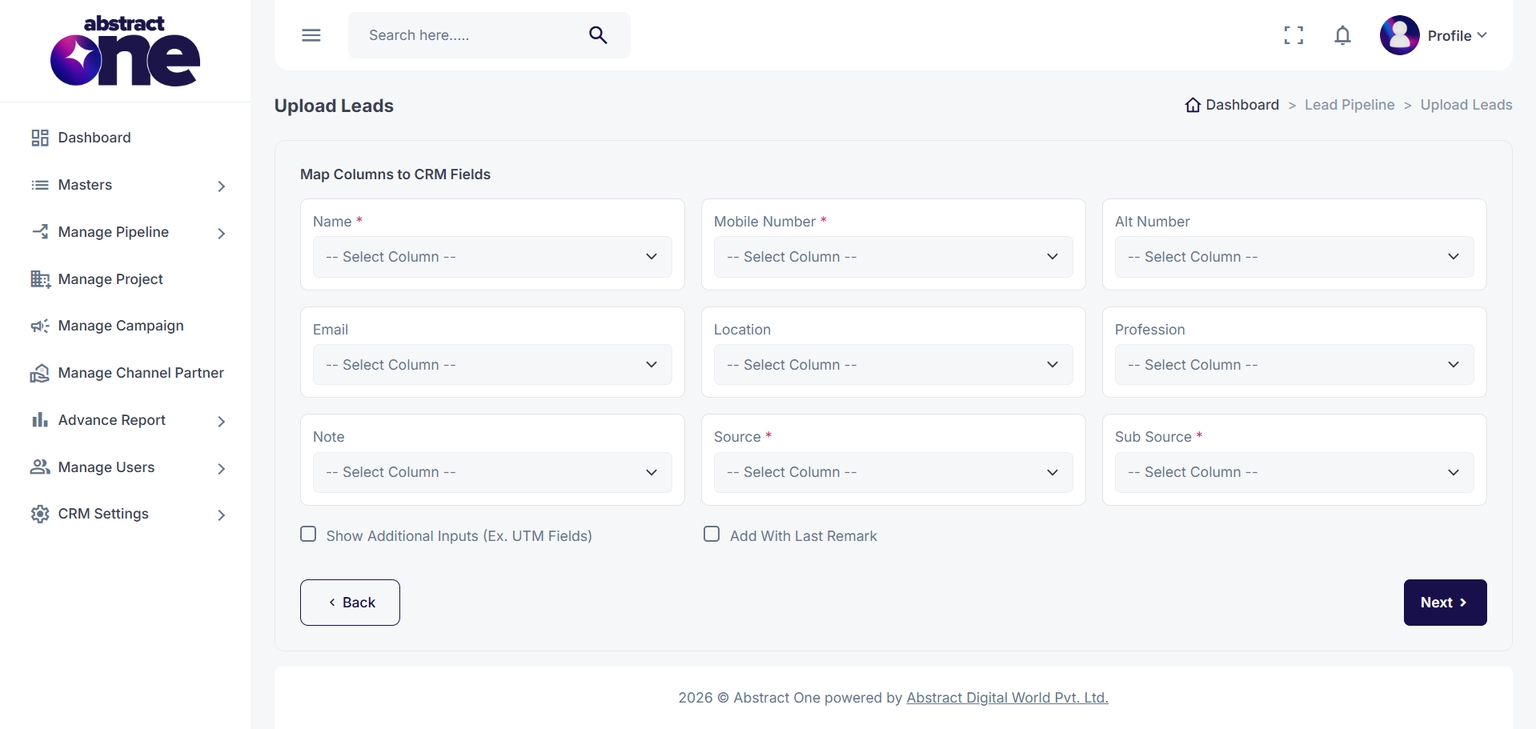
In this step, users need to map Excel sheet columns with CRM fields.
Mandatory CRM Fields
The following mappings are required:
- Name
- Mobile Number
- Source
- Sub Source
Other fields can also be mapped if data is available.
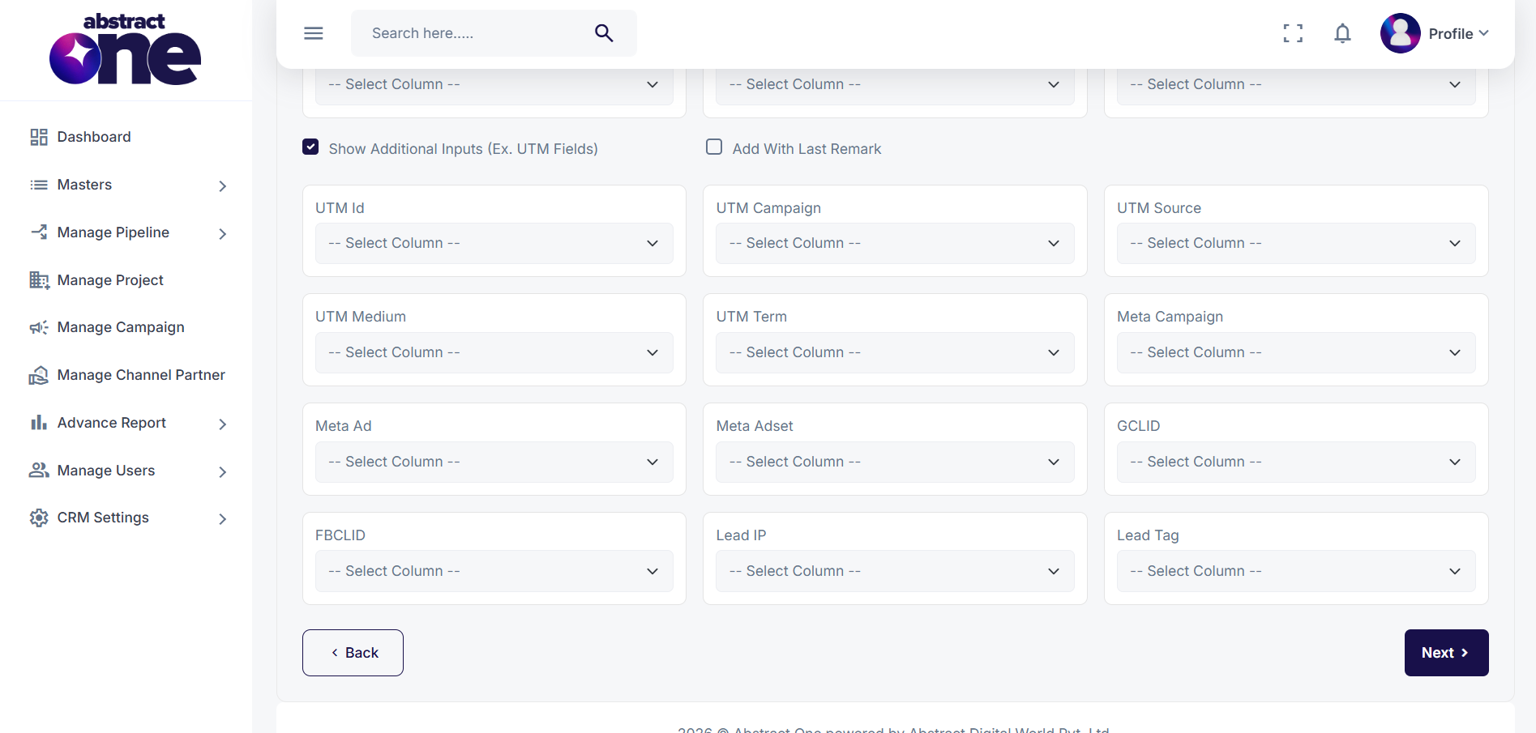
Use Additional Inputs (Optional)
If your sheet contains extra tracking fields like:
- UTM Source
- UTM Campaign
- Meta Campaign
- FBCLID
- GCLID
- Lead IP
- Lead Tags
Enable: Show Additional Inputs
This will display more CRM mapping fields.
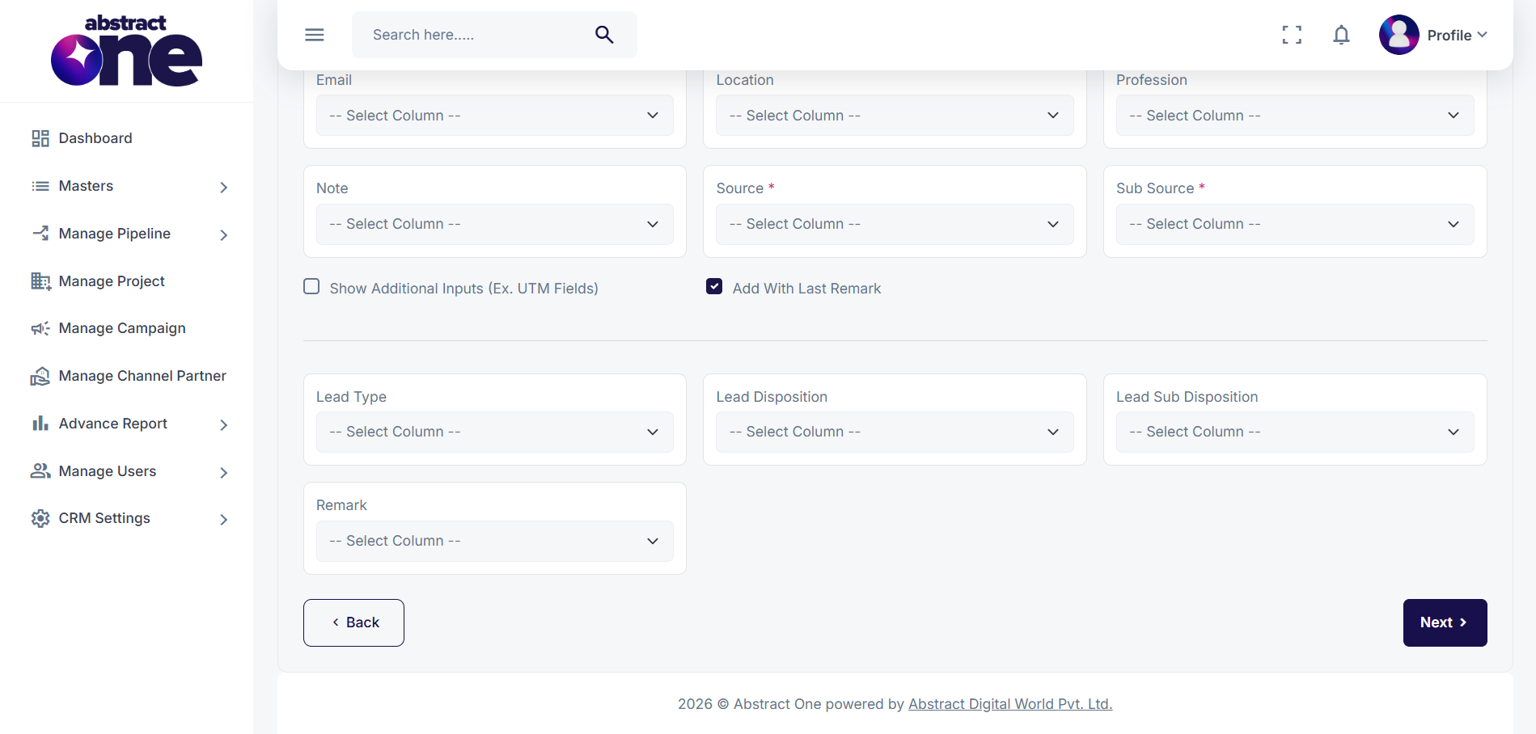
Upload Leads With Remarks (Optional)
If leads already contain remarks/dispositions, enable: Add With Last Remark
Additional mapping fields will appear:
- Lead Type
- Lead Disposition
- Lead Sub Disposition
- Remark
These fields become mandatory for remark-based uploads.
After completing the mapping, click Next.
Step 4 — Assign Leads
In this step, users define how uploaded leads should be assigned.
There are 3 assignment methods available:
1. Round Robin Assignment
Leads will be distributed equally among all active presales users.
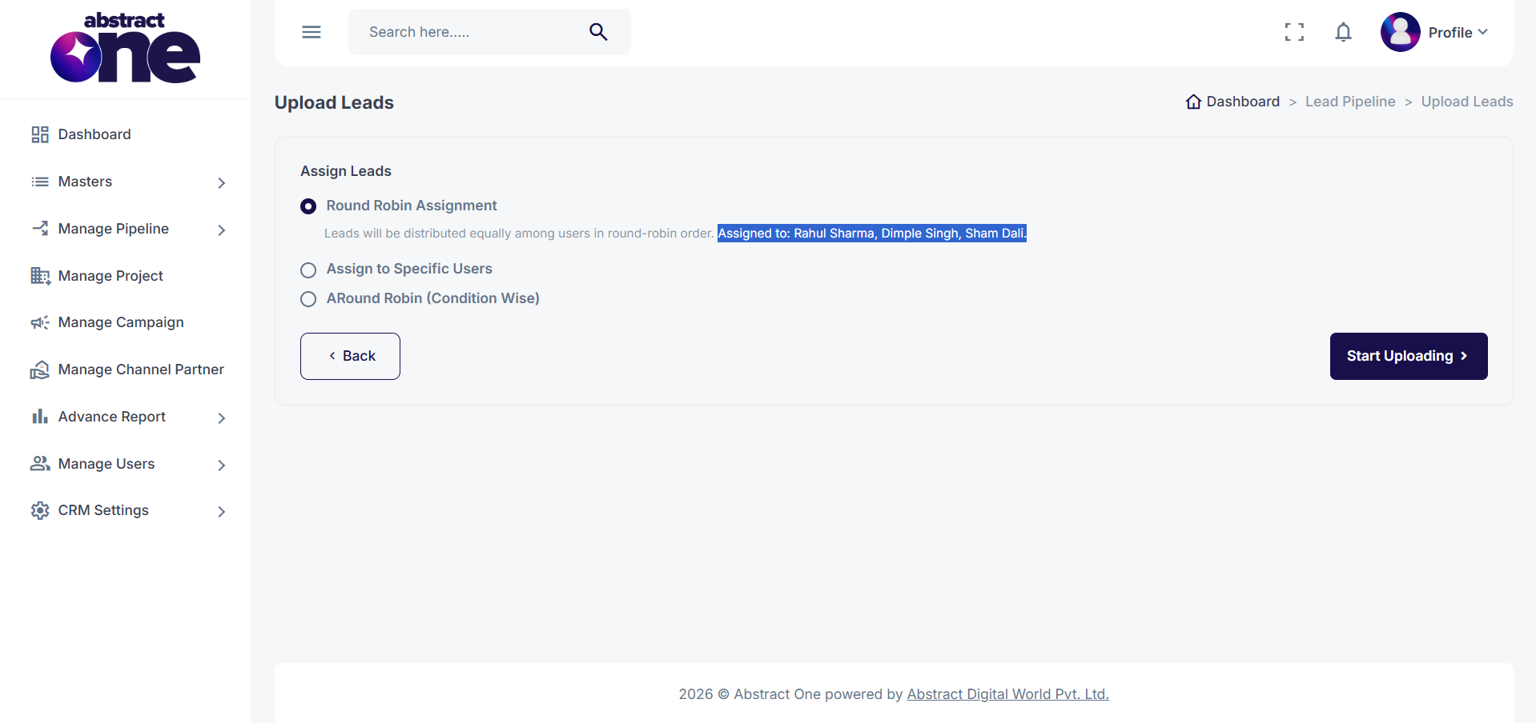
2. Assign to Specific Users
Use this option when leads should only be assigned to selected users.
Multiple user selection is supported.
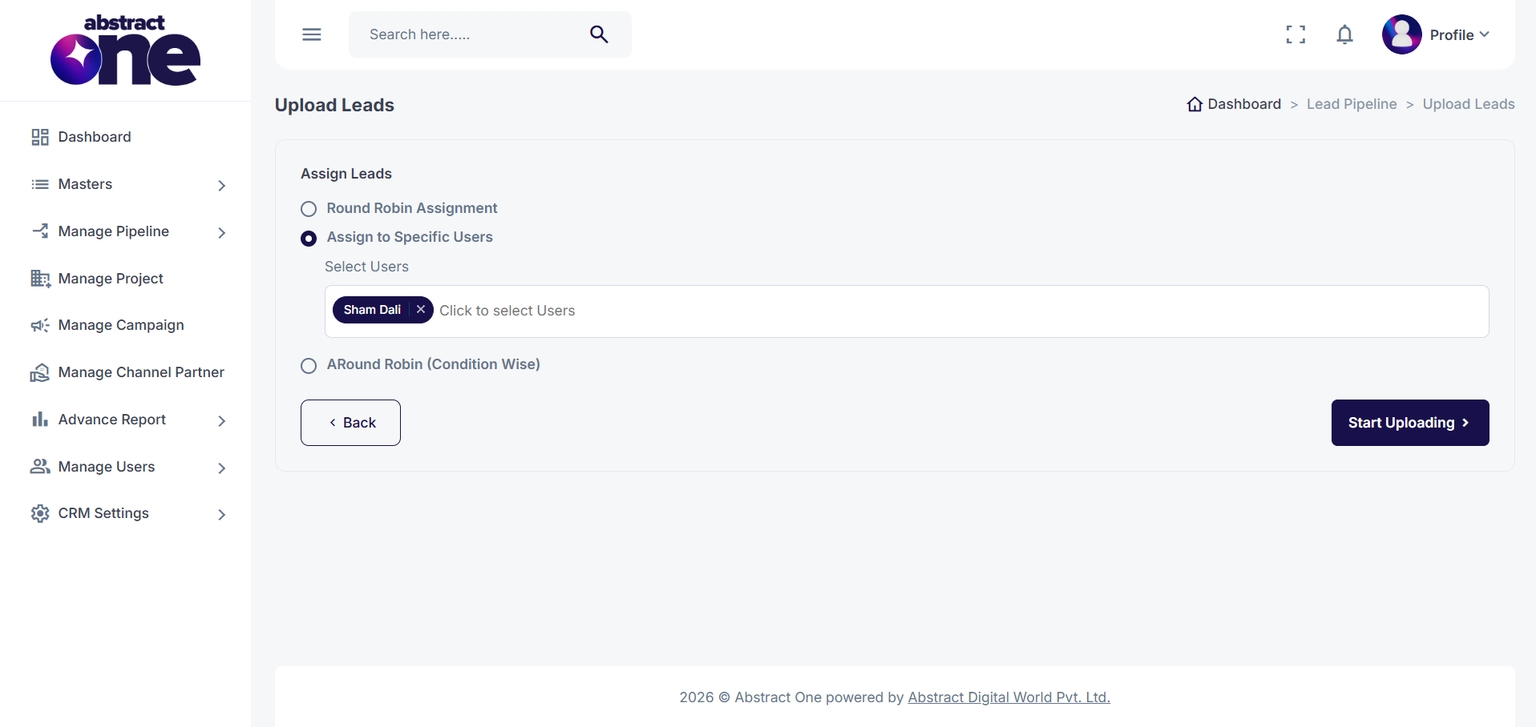
3. Round Robin (Condition Wise)
If condition-based assignment rules are already configured in CRM settings, users can assign leads using those predefined conditions.
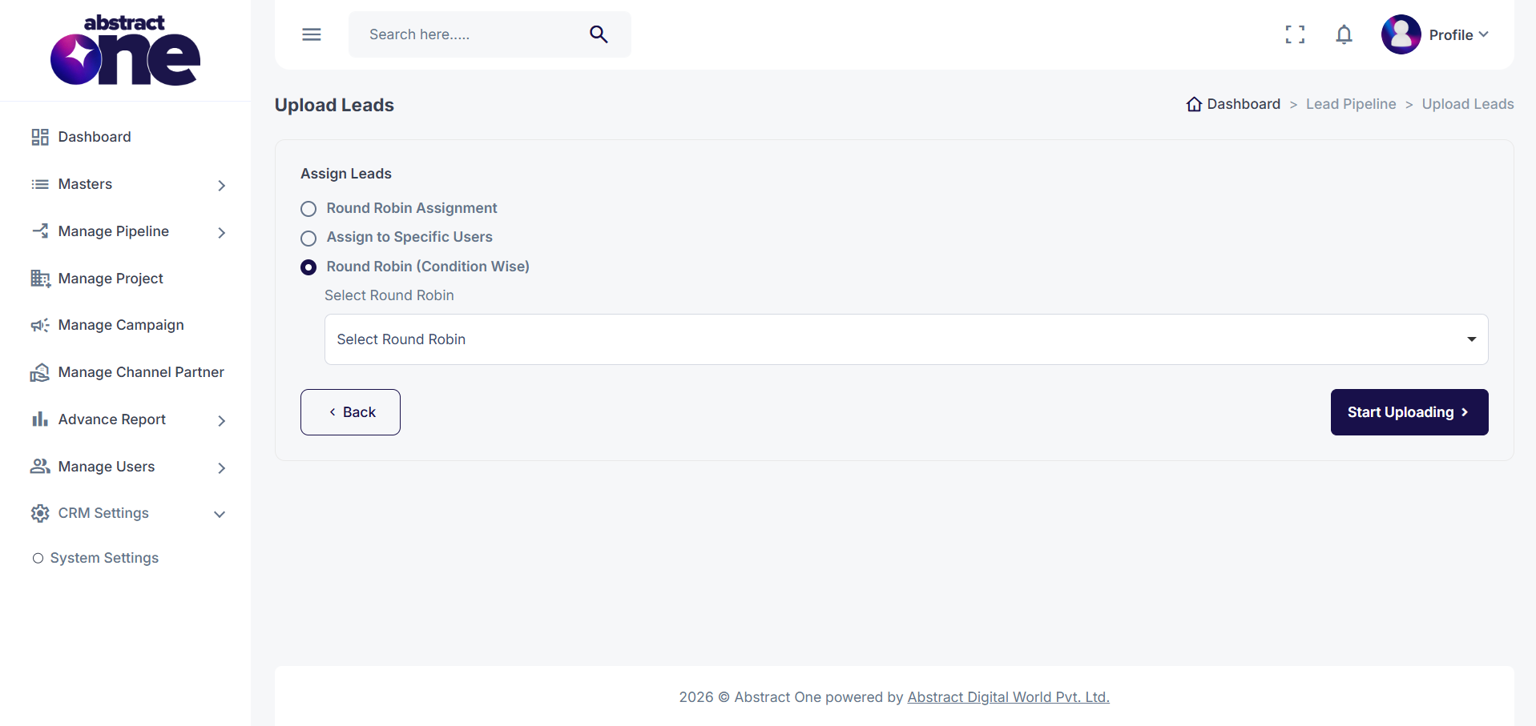
After selecting the assignment method, click: Start Uploading
Step 5 — Upload Processing & Final Status
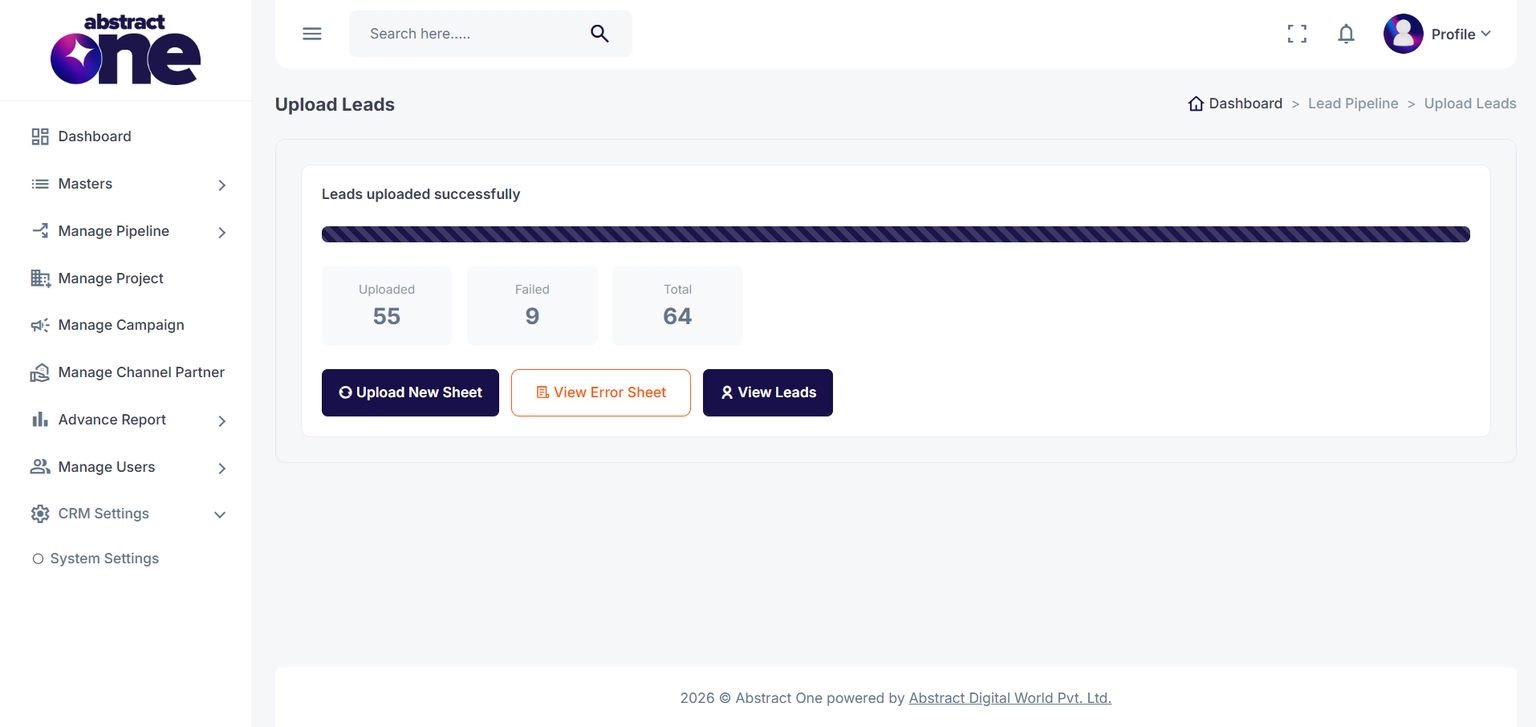
Once uploading starts, the system processes leads in real time.
After completion, users can view:
- Total Leads
- Successfully Uploaded Leads
- Failed Leads
Available Actions
- Upload New Sheet
- View Leads
- Download Error Sheet
Error Sheet
If any lead fails during upload, it will appear in the error sheet along with the reason.
Example validation errors:
- Source does not exist
- Invalid mobile number
- Missing mandatory fields
- Invalid disposition/sub disposition
- Duplicate data
- Invalid field mapping
Important Notes
- Always verify Source/Sub Source before upload
- Use sample sheet format for best results
- Ensure all mandatory mappings are completed
- For remark uploads, Lead Type + Disposition fields are required
- Large uploads may take some time depending on sheet size