

WordPress Integration
Use the Lead Integration with Abstract One WordPress plugin to send form submissions from your website directly into Abstract One CRM in real time. The plugin connects forms built with Contact Form 7 or WPForms to your CRM — no custom code required.
When a visitor submits a connected form, the plugin maps the form fields to CRM parameters and creates the lead automatically using your configured API credentials.
Download plugin
Download the Lead Integration with Abstract One plugin zip file and install it on your WordPress site.
Prerequisites
Before installing and activating the plugin, make sure the following are ready on your WordPress site:
- Contact Form 7 and/or WPForms installed and active.
- At least one enquiry or contact form already created using one of these plugins.
- Your Abstract One CRM credentials ready:
- API Key — see Generate API Key
- Project ID — see Get Project ID
- Campaign ID — see Get Campaign ID
- Sub Source — see Get Sub Source
Important: Create your WordPress form before activating the Abstract One plugin. The form must exist so you can select it when configuring the workflow.
How it works
- Install and activate the Lead Integration with Abstract One plugin.
- Create a workflow under Abstract One → Add Workflow.
- Select your form plugin (Contact Form 7 or WPForms) and the specific form.
- Enter your CRM API Key, Project ID, Campaign ID, and Sub Source.
- Map your form fields to CRM parameters. Name and mobile number are required.
- Set the workflow status to Active. Every form submission is then sent to CRM in real time.
The plugin also includes an Instructions page in the WordPress admin (Abstract One → Instructions) with parameter reference tables and security notes.
Step-by-step setup
Step 1 — Install the plugin
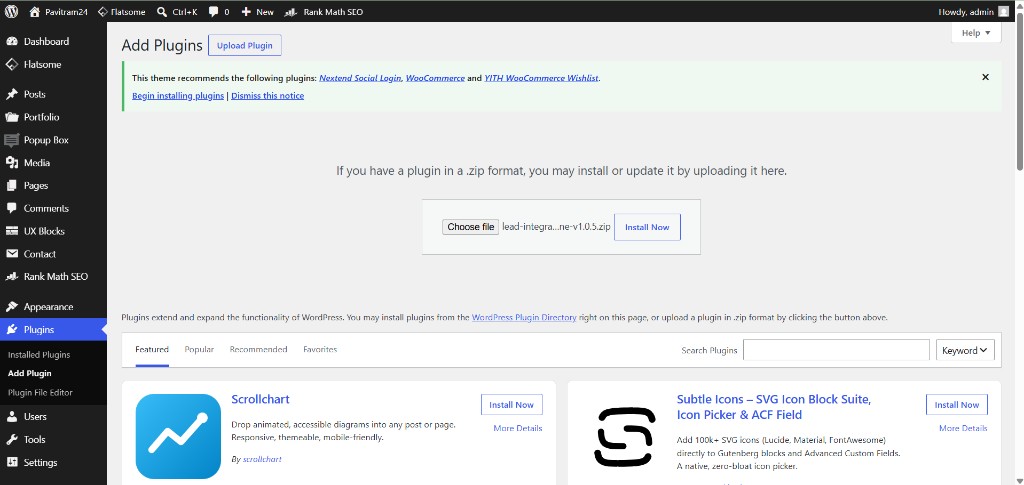
First, download the plugin zip file from this page. Then go to Plugins → Add Plugin in your WordPress admin. You can install the plugin in either of these ways:
- Upload: Click Upload Plugin, choose the downloaded
lead-integration-abstract-one-v1.0.7.zipfile, then click Install Now. - Search: Search for Lead Integration with Abstract One in the plugin directory and click Install Now.
Step 2 — Activate the plugin
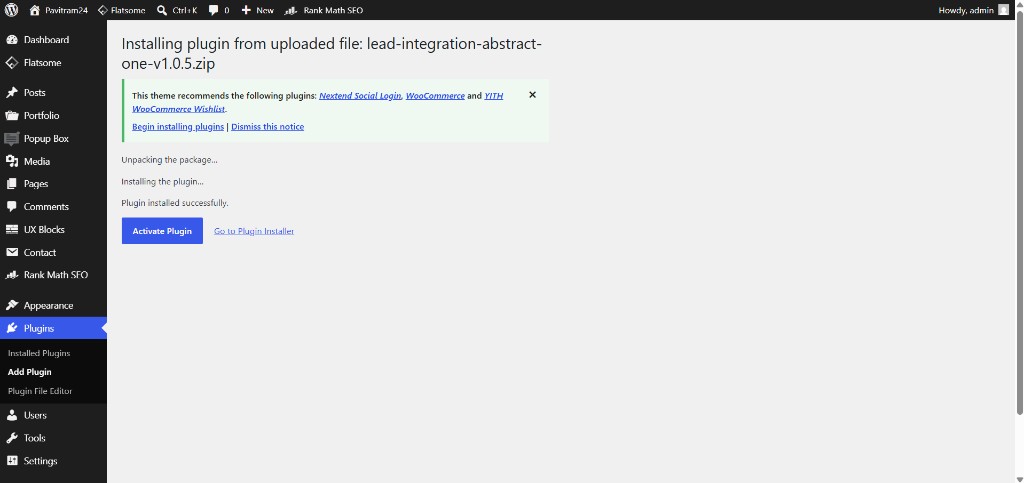
After installation completes, click Activate Plugin on the confirmation screen. You can also activate it later from Plugins → Installed Plugins.
Step 3 — Open Add Workflow
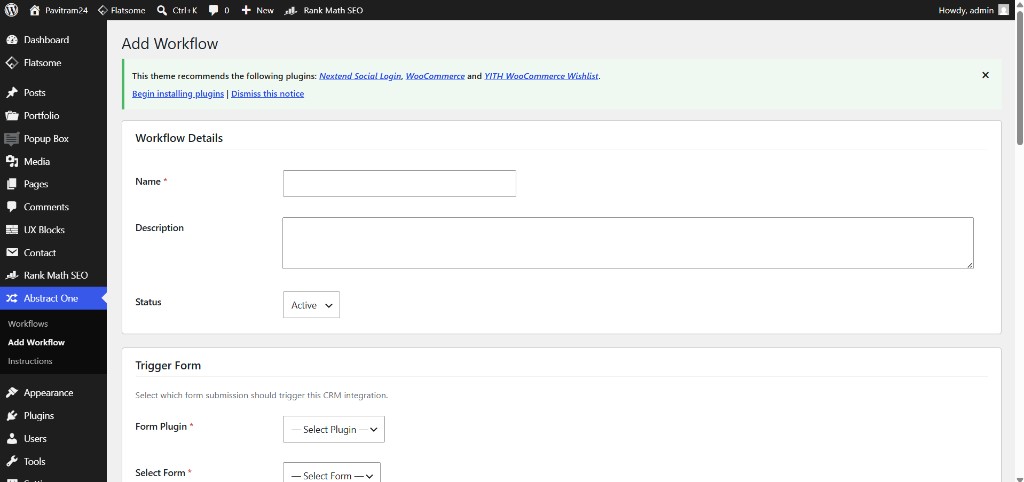
Once activated, a new Abstract One menu appears in the WordPress sidebar. Click Abstract One → Add Workflow to create a new integration.
You can also go to Abstract One → Workflows and click Add New.
Step 4 — Fill in Workflow Details
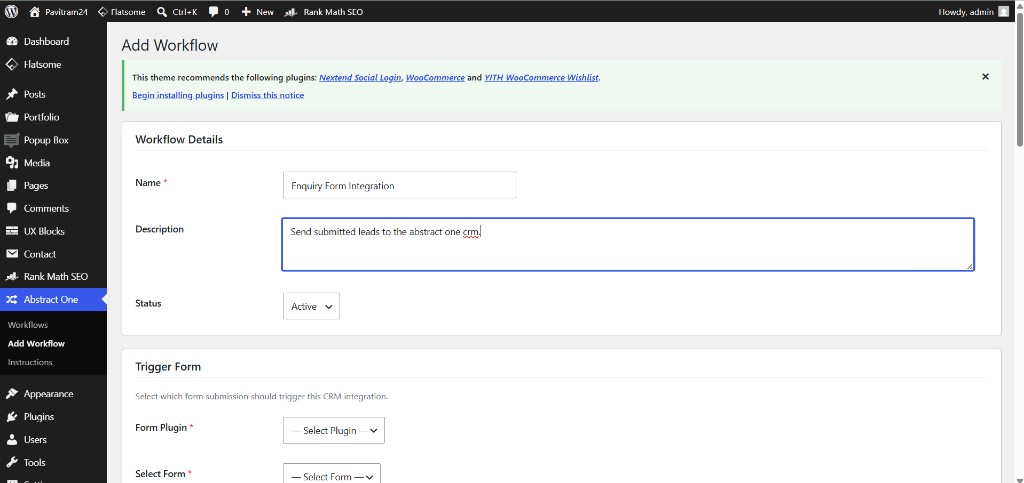
In the Workflow Details section, enter:
- Name (required) — a descriptive name for this integration, e.g.
Enquiry Form Integration. - Description (optional) — notes about what this workflow does.
- Status — set to Active to start sending leads immediately, or Inactive to save without enabling.
Step 5 — Select the trigger form
In the Trigger Form section, choose which form submission should trigger the CRM integration:
- Form Plugin (required) — select Contact Form 7 or WPForms.
- Select Form (required) — pick the specific form you created earlier.
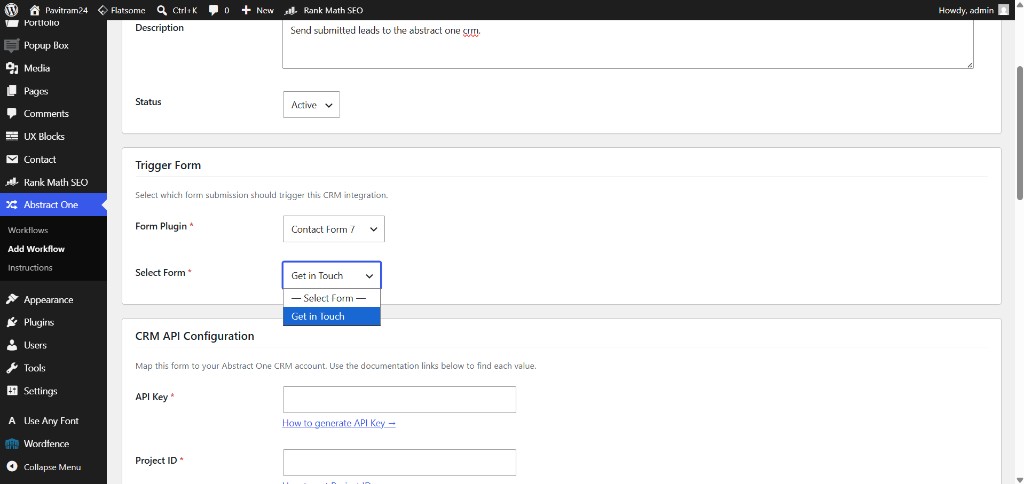
Step 6 — Set CRM API Configuration
In the CRM API Configuration section, enter your Abstract One CRM credentials. Use the help links below each field to find the correct values in CRM:
- API Key (required) — your CRM API key. See Generate API Key.
- Project ID (required) — e.g.
AAP002. See Get Project ID. - Campaign ID (required) — must belong to the selected project, e.g.
AAC003. See Get Campaign ID. - Sub Source (required) — sub source name from CRM, e.g.
Project Landing Page. See Get Sub Source.
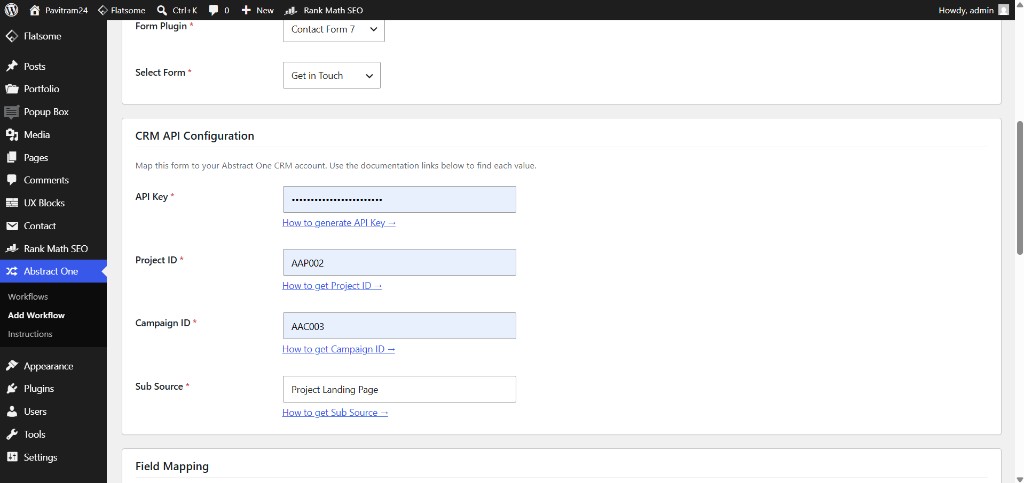
Step 7 — Map form fields to CRM parameters
In the Field Mapping section, match each CRM parameter to the corresponding form field using the dropdown menus.
Mandatory fields
| CRM Parameter | Description |
|---|---|
name |
Lead full name — map to your form's name field. |
mobile_number |
10-digit Indian mobile (starts with 6–9). Country code and spaces are stripped automatically. |
Optional fields
| CRM Parameter | Description |
|---|---|
alternate_number |
Alternate mobile (10 digits, must differ from primary mobile) |
email |
Lead email address |
notes |
Additional enquiry details or message |
profession |
Lead profession or occupation |
location |
Lead city or location |
utm_id |
UTM ID from page URL |
utm_campaign |
UTM campaign parameter |
utm_source |
UTM source parameter |
utm_medium |
UTM medium parameter |
utm_term |
UTM term parameter |
Map only the fields that exist on your form. Unmapped optional fields are simply not sent to CRM.
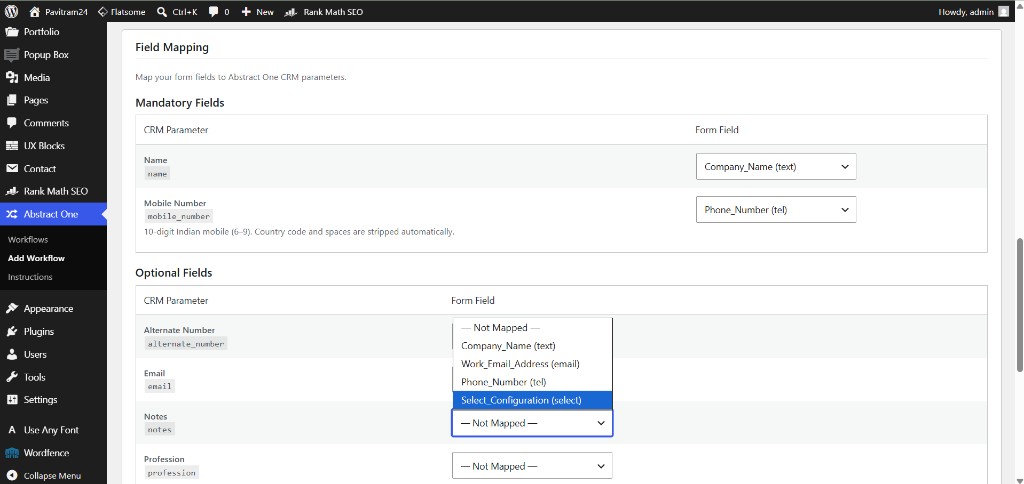
Step 8 — Create the workflow
Scroll to the bottom of the page and click Create Workflow to save your configuration. Use Cancel to discard changes.
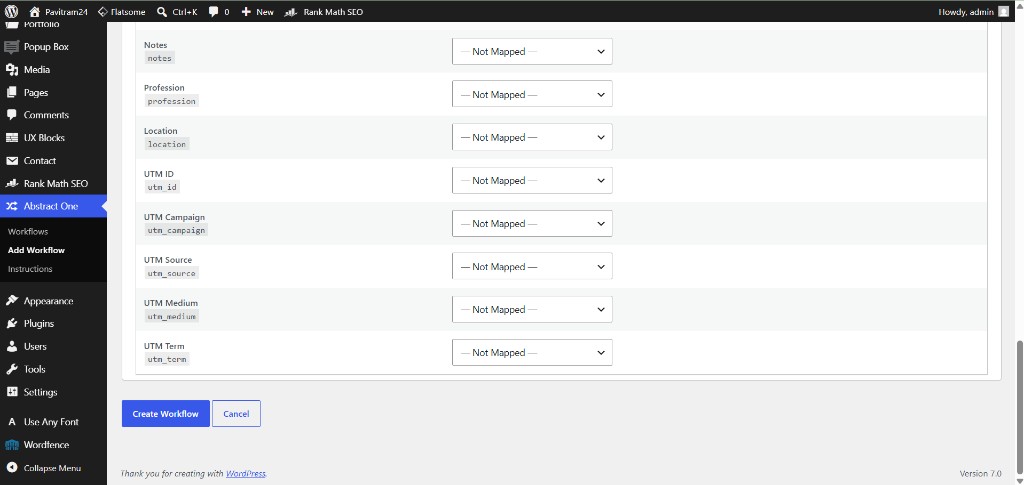
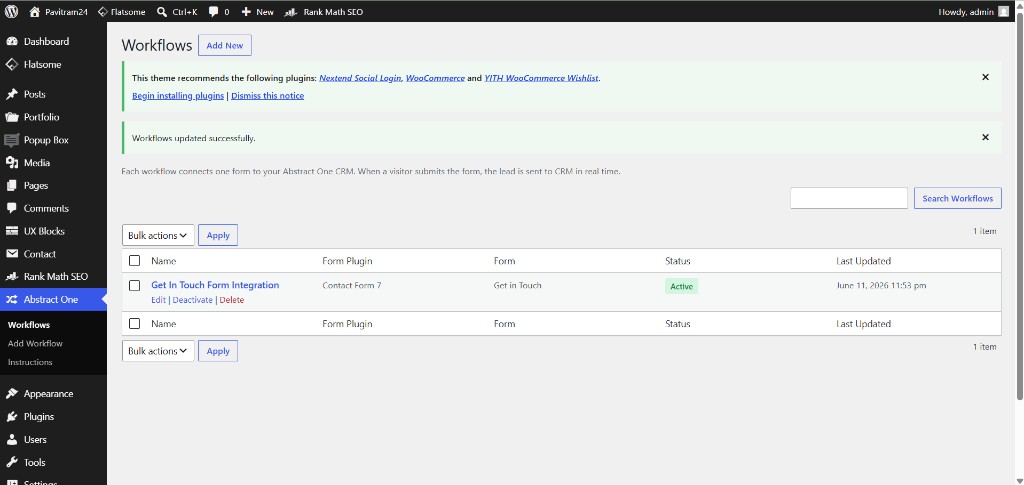
Step 9 — Verify the workflow is active
Go to Abstract One → Workflows to see your saved workflow in the list. Confirm:
- Status shows Active (green badge).
- Form Plugin and Form match your selected form.
From this page you can Edit, Deactivate, or Delete the workflow at any time.
Step 10 — Test the integration
To confirm the integration is working correctly:
- Open the connected form on your website (the live page where visitors submit enquiries).
- Submit a test lead with valid test data (use a real 10-digit mobile number format).
- Log in to Abstract One CRM and verify the lead appears with the correct project, campaign, sub source, and mapped field values.
If the lead does not appear in CRM, check that the workflow status is Active, the API credentials are correct, and the mandatory field mappings (name and mobile_number) are set properly.
Security notes
- Encryption — API keys are encrypted before storage and never exposed on the front end.
- Access control — only administrators with
manage_optionscapability can configure workflows. - Nonces — all admin actions are protected with WordPress nonces to prevent CSRF attacks.
- Sanitization — lead data is validated and sanitized before being sent to CRM.
Best practice: Never share your API key publicly or commit it to source control.
Alternative: API integration
If you prefer a custom integration without the WordPress plugin, you can send leads directly using the Website Form Integration API.